Tuesday, December 18, 2012
Today I am going to post how you can convert any image to gray scale in Java. First the image is read from a file using javax.imageio.ImageIO class as a BuffertedImage. A function is written that takes in a BufferedImage as parameter and returns a color converted image. An instance of java.awt.image.ColorConvertOp is created which takes in an object of java.awt.color.ColorSpace as first parameter and null as 2nd parameter( since there is no RenderingHints). Then the filter(src,dest) method is called which actually does the work. Then the final image is written to a file in jpeg format as dest.jpg .
How ColorCovertOp works : This class performs a pixel-by-pixel color conversion of the data in the source image. The resulting color values are scaled to the precision of the destination image. Color conversion can be specified via an array of ColorSpace objects or an array of ICC_Profile objects.
ColorSpace class : This is an abstract class whose getInstance(int) method is called to get an instance and CS_GRAY is passed as parameter which defines a built in linear gray scale color space.
Screenshots of images are shown below
--------------------------------------------------------------------------------------------------------------------------
import java.io.File;
import java.awt.Color;
import java.awt.Graphics;
import java.awt.Graphics2D;
import java.awt.color.ColorSpace;
import javax.swing.JFrame;
import javax.swing.JPanel;
import java.awt.image.BufferedImage;
import java.awt.image.ColorConvertOp;
import javax.imageio.ImageIO;
@SuppressWarnings("serial")
public class GrayScale extends JPanel{
@Override
public void paintComponent(Graphics g){
Graphics2D g2d=(Graphics2D)g;
try{ //reading from file
BufferedImage src=ImageIO.read(new File("src.jpg"));
BufferedImage dest=convertToGray(src); //getting destination image
g2d.drawImage(dest,0,0,this); /* drawing the image on panel and then writing to a file */
ImageIO.write(dest,"jpeg",new File("dest.jpg"));
}catch(Exception e){
e.printStackTrace();
}
}
public BufferedImage convertToGray(BufferedImage src){
//creating instance and using in-built linear gray scale
ColorConvertOp grayOp = new ColorConvertOp(
ColorSpace.getInstance(ColorSpace.CS_GRAY), null);
return grayOp.filter(src,null); //converting to gray scale
}
public static void main (String[] args) {
JFrame jf=new JFrame("GRAY_SCALE");
GrayScale obj=new GrayScale();
jf.getContentPane().add(obj);
jf.setVisible(true);
jf.setSize(320,235);
jf.setDefaultCloseOperation(jf.EXIT_ON_CLOSE);
}
}
--------------------------------------------------------------------------------------------------------------------------
DOWNLOAD the source from 4shared
--------------------------------------------------------------------------------------------------------------------------
Reflect or flip an image
Change brightness of image using RescaleOp
Java program to draw partially transparent image using Graphics2D
How ColorCovertOp works : This class performs a pixel-by-pixel color conversion of the data in the source image. The resulting color values are scaled to the precision of the destination image. Color conversion can be specified via an array of ColorSpace objects or an array of ICC_Profile objects.
ColorSpace class : This is an abstract class whose getInstance(int) method is called to get an instance and CS_GRAY is passed as parameter which defines a built in linear gray scale color space.
Screenshots of images are shown below
 |
| Original image |
 | |
| Gray Scale image |
--------------------------------------------------------------------------------------------------------------------------
Java Source Code
--------------------------------------------------------------------------------------------------------------------------import java.io.File;
import java.awt.Color;
import java.awt.Graphics;
import java.awt.Graphics2D;
import java.awt.color.ColorSpace;
import javax.swing.JFrame;
import javax.swing.JPanel;
import java.awt.image.BufferedImage;
import java.awt.image.ColorConvertOp;
import javax.imageio.ImageIO;
@SuppressWarnings("serial")
public class GrayScale extends JPanel{
@Override
public void paintComponent(Graphics g){
Graphics2D g2d=(Graphics2D)g;
try{ //reading from file
BufferedImage src=ImageIO.read(new File("src.jpg"));
BufferedImage dest=convertToGray(src); //getting destination image
g2d.drawImage(dest,0,0,this); /* drawing the image on panel and then writing to a file */
ImageIO.write(dest,"jpeg",new File("dest.jpg"));
}catch(Exception e){
e.printStackTrace();
}
}
public BufferedImage convertToGray(BufferedImage src){
//creating instance and using in-built linear gray scale
ColorConvertOp grayOp = new ColorConvertOp(
ColorSpace.getInstance(ColorSpace.CS_GRAY), null);
return grayOp.filter(src,null); //converting to gray scale
}
public static void main (String[] args) {
JFrame jf=new JFrame("GRAY_SCALE");
GrayScale obj=new GrayScale();
jf.getContentPane().add(obj);
jf.setVisible(true);
jf.setSize(320,235);
jf.setDefaultCloseOperation(jf.EXIT_ON_CLOSE);
}
}
--------------------------------------------------------------------------------------------------------------------------
Download Links
--------------------------------------------------------------------------------------------------------------------------DOWNLOAD the source from 4shared
--------------------------------------------------------------------------------------------------------------------------
Related Posts
--------------------------------------------------------------------------------------------------------------------------Reflect or flip an image
Change brightness of image using RescaleOp
Java program to draw partially transparent image using Graphics2D
Monday, December 3, 2012
Today I am going to post a program that will be able to produce all the mColorings of a given graph G.
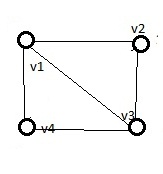
What is mColoring : The problem statement says that for a given graph G(V,E) and m colors, we have to color all the vertices the graph G with m-colors in all possible ways. This is called m-coloring of a graph G. Suppose for a graph G and 3 colors , we have to show all its 3-colorings.
How to solve the problem : Here we first define a function mColoring(int k) that will use the concept of backtracking. Here in this function we call another function next_color(int k) that will try to color the kth vertex. Now if we are successful then check whether all vertex have been colored. If it is true then we print the solution and then try another solution vector otherwise color the remaining vertex. If we were unsuccessful then we go back (backtrack)) to the last successful situation and try a different path. Our final solution i.e. all the possible m-colorings can be represented as a tree.
--------------------------------------------------------------------------------------------------------------------------
What is mColoring : The problem statement says that for a given graph G(V,E) and m colors, we have to color all the vertices the graph G with m-colors in all possible ways. This is called m-coloring of a graph G. Suppose for a graph G and 3 colors , we have to show all its 3-colorings.
How to solve the problem : Here we first define a function mColoring(int k) that will use the concept of backtracking. Here in this function we call another function next_color(int k) that will try to color the kth vertex. Now if we are successful then check whether all vertex have been colored. If it is true then we print the solution and then try another solution vector otherwise color the remaining vertex. If we were unsuccessful then we go back (backtrack)) to the last successful situation and try a different path. Our final solution i.e. all the possible m-colorings can be represented as a tree.
 |
| Graph G to be colored |
 |
| Tree for 3-coloring of graph G |
--------------------------------------------------------------------------------------------------------------------------
Java Source Code
--------------------------------------------------------------------------------------------------------------------------
public class MWayGrColor{
    /*G is graph's adjacency matrix and x is solution vector */
    private int G[][],x[],n,m,soln;

    public void mColoring(int k){  //backtracking function
        for(int i=1;i<=n;i++){
           next_color(k);  //coloring kth vertex
           if(x[k]==0)
              return;  //if unsuccessful then backtrack
           if(k==n)  //if all colored then show
              write();
           else
              mColoring(k+1);  /* successful but still left to color */
        }
   }

   private void next_color(int k){
      do{
           int i=1;
         x[k]=(x[k]+1)%(m+1);
         if(x[k]==0)
           return;
         for(i=1;i<=n;i++)
            if(G[i][k]!=0 && x[k]==x[i])  /* checking adjacency and not same color */
               break;
         if(i==n+1)   return;  //new color found
      }while(true);
   }

   private void write(){
      System.out.print("\nColoring(V C) #  "+(++soln)+"-->");
      for(int i=1;i<=n;i++)
          System.out.print("\t("+i+" "+x[i]+")");  //solution vector
   }

   public void input(){
         java.util.Scanner sc=new java.util.Scanner(System.in);
         System.out.print("Enter no. of vertices : ");
         n=sc.nextInt();
         G=new int[n+1][n+1];
         x=new int[n+1];
         System.out.print("Enter no. of colors : ");
         m=sc.nextInt();
        System.out.println("Enter adjacency matrix-->");
        for(int i=1;i<=n;i++)
           for(int j=1;j<=n;j++)
               G[i][j]=sc.nextInt();
   }

   public static void main (String[] args) {
        MWayGrColor obj=new MWayGrColor();
        obj.input();
        obj.mColoring(1);
        if(obj.soln==0)
           System.out.println("\nNeed more than "+obj.m+" colors");
        else
           System.out.print("\nTOTAL SOLN : "+obj.soln);
   }
}
--------------------------------------------------------------------------------------------------------------------------
Output
--------------------------------------------------------------------------------------------------------------------------
Enter no. of vertices : 4
Enter no. of colors : 3
Enter adjacency matrix-->
0 1 1 1
1 0 1 0
1 1 0 1
1 0 1 0
Coloring(V C) # 1--> (1 1) (2 2) (3 3) (4 2)
Coloring(V C) # 2--> (1 1) (2 3) (3 2) (4 3)
Coloring(V C) # 3--> (1 2) (2 1) (3 3) (4 1)
Coloring(V C) # 4--> (1 2) (2 3) (3 1) (4 3)
Coloring(V C) # 5--> (1 3) (2 1) (3 2) (4 1)
Coloring(V C) # 6--> (1 3) (2 2) (3 1) (4 2)
TOTAL SOLN : 6
--------------------------------------------------------------------------------------------------------------------------
Download Links
--------------------------------------------------------------------------------------------------------------------------
DOWNLOAD the source from Mediafire
DOWNLOAD the source from Dropbox
DOWNLOAD the source from 4shared
DOWNLOAD the source from Dropbox
DOWNLOAD the source from 4shared
--------------------------------------------------------------------------------------------------------------------------
Related Posts
--------------------------------------------------------------------------------------------------------------------------
To color a graph with least number of colors visit
Sunday, November 25, 2012
Everyone of you know that files are being uploaded to the server and you can easily download them. You must have thought of how these files are being uploaded to server. Today I am going to post how you can very easily create your own file upload server; Previously before Servlet3.0 technology you might have seen that it was a bit difficult process and you had to use third-party library like Apache-commons. But now it has become very easy.
--------------------------------------------------------------------------------------------------------------------------- The first thing you will have to do is to create the upload-form using HTML. In the form you will have to mention the enctype="multipart/form-data" .
- In servlet there is an annotation called MultipartConfig . It has different params like location, maxFileSize and so on. The location should be a valid folder path on server where the file will be uploaded. Now write the part and also do string processing to get the name of the file ro use the same name while uploading it.
- Now display the details of the file uploaded by request forwarding to a JSP.
HTML form and code
--------------------------------------------------------------------------------------------------------------------------
Select a file to upload
<html>
<body>
<h3>File Upload Form</h3>
Select a file to upload
<form action="./upload.html" method="post"
enctype="multipart/form-data">
<input type="file" name="file" size="50" />
<br/>
<input type="submit" value="Upload File" />
</form>
</body>
</html>
--------------------------------------------------------------------------------------------------------------------------
--------------------------------------------------------------------------------------------------------------------------
<body>
<h3>File Upload Form</h3>
Select a file to upload
<form action="./upload.html" method="post"
enctype="multipart/form-data">
<input type="file" name="file" size="50" />
<br/>
<input type="submit" value="Upload File" />
</form>
</body>
</html>
--------------------------------------------------------------------------------------------------------------------------
Servlet and JSP Code
--------------------------------------------------------------------------------------------------------------------------
/* Servlet Code */
import java.io.IOException;
import java.util.Collection;
import javax.servlet.RequestDispatcher;
import javax.servlet.ServletException;
import javax.servlet.annotation.MultipartConfig;
import javax.servlet.annotation.WebServlet;
import javax.servlet.http.HttpServlet;
import javax.servlet.http.HttpServletRequest;
import javax.servlet.http.HttpServletResponse;
import javax.servlet.http.Part;
@WebServlet("/upload.html")
@MultipartConfig(location="D:/ Documents",fileSizeThreshold=1024*1024,
maxFileSize=50*1024*1024,maxRequestSize=5*1024*1024*1024)
public final class Uploader extends HttpServlet {
private static final long serialVersionUID = 1L;
protected void doPost(HttpServletRequest request, HttpServletResponse response) throws ServletException, IOException {
Collection<Part> parts=request.getParts();
StringBuffer sb=new StringBuffer();
sb.append("<h2>Total "+parts.size()+" parts uploaded</h2>");
for(Part p: parts){
getDetails(sb, p);
p.write(getFileName(p)); //writing file to server
}
request.setAttribute("partDetails",sb);
RequestDispatcher view=request.getRequestDispatcher("result.jsp");
view.forward(request, response); //forwarding to JSP
}
private String getFileName(Part p){
String header=p.getHeader("content-disposition");
String filename = header.substring(header.indexOf("filename=\"")).split("\"")[1]; //getting filename
return filename;
}
private void getDetails(StringBuffer sb,Part p){
sb.append("<p></p>");
for(String header:p.getHeaderNames()){
sb.append("<b>"+header+" : </b>");
sb.append(p.getHeader(header)+"</br>");
}
}
}
/* JSP Code */
<html>
<head><title>Upload Details</title></head>
<% StringBuffer result=(StringBuffer)request.getAttribute("partDetails");
%>
<body>
<%= result %>
</body>
</html>
<head><title>Upload Details</title></head>
<% StringBuffer result=(StringBuffer)request.getAttribute("partDetails");
 |
| Output as seen in Chrome |
<body>
<%= result %>
</body>
</html>
--------------------------------------------------------------------------------------------------------------------------
DOWNLOAD LINKS
--------------------------------------------------------------------------------------------------------------------------
Friday, October 26, 2012
--------------------UPDATE-------------------
I have updated my post so that now it can detect IE 11. This modification was necessary as the user-agent of Internet Explorer 11.0 was changed. So check the new code which has an additional if-else block in class BrowserRecognitionModel .
---------------------------------------------------
Today I am going to post program which will be able to detect client's browser details i.e. browser name and version using servlets and JSPs. First of all, user-agent header is extracted and then string processing is done to obtain browser name and version.
Benefits : You will be able to detect which browser is being used by client. Moreover the whole application is being written following the MVC pattern.
BrowserRecogntionServlet.java : contains the code for extracting user-agent and hands it over to the model class and then forwards the result to the JSP and thus acting as controller.
BrowserRecognitionModel.java : contains the code that processes the string and gets the browser version and name.
browserDetails.jsp : contains the code for showing result.
Screenshots of output as seen in Chrome and Firefox :
--------------------------------------------------------------------------------------------------------------------------
I have updated my post so that now it can detect IE 11. This modification was necessary as the user-agent of Internet Explorer 11.0 was changed. So check the new code which has an additional if-else block in class BrowserRecognitionModel .
---------------------------------------------------
Today I am going to post program which will be able to detect client's browser details i.e. browser name and version using servlets and JSPs. First of all, user-agent header is extracted and then string processing is done to obtain browser name and version.
Benefits : You will be able to detect which browser is being used by client. Moreover the whole application is being written following the MVC pattern.
BrowserRecogntionServlet.java : contains the code for extracting user-agent and hands it over to the model class and then forwards the result to the JSP and thus acting as controller.
BrowserRecognitionModel.java : contains the code that processes the string and gets the browser version and name.
browserDetails.jsp : contains the code for showing result.
Screenshots of output as seen in Chrome and Firefox :
 |
| Output in Chrome |
 |
| Output in Firefox |
--------------------------------------------------------------------------------------------------------------------------
SOURCE CODE
--------------------------------------------------------------------------------------------------------------------------
/* Code for servlet(BrowserRecogntionServlet.java) */
/* Code for servlet(BrowserRecogntionServlet.java) */
package detector.servlets;

import detector.model.BrowserRecognitionModel;
import java.io.PrintWriter;
import java.io.IOException;
import javax.servlet.RequestDispatcher;
import javax.servlet.ServletException;
import javax.servlet.http.HttpServlet;
import javax.servlet.http.HttpServletRequest;
import javax.servlet.http.HttpServletResponse;
import javax.servlet.annotation.WebServlet;

@WebServlet("/detect.html")
public class BrowserRecognitionServlet extends HttpServlet{
    @Override
    public void doGet(HttpServletRequest req,HttpServletResponse res)throws IOException,ServletException{
        String userAgent=req.getHeader("user-agent");
        /*passing data to model class */
        BrowserRecognitionModel browserDetails=new BrowserRecognitionModel(userAgent);
        /* setting attribute to request for the JSP */
        req.setAttribute("model",browserDetails);
        /* forwarding to JSP for output */
        RequestDispatcher view=req.getRequestDispatcher("/browserDetails.jsp");
        view.forward(req,res);
        }
}
/* Code for model class(BrowserRecognitionModel.java) */
package detector.model;

public class BrowserRecognitionModel {
    private String userAgent,browserName,browserVer;
    public BrowserRecognitionModel(String userAgent){
        this.userAgent=userAgent;
        process();
    }
    private void process(){
        browserName="unknown";
        browserVer="unknown";
        if(userAgent.contains("Chrome")){ //checking if Chrome
            String substring=userAgent.substring(userAgent.indexOf("Chrome")).split(" ")[0];
            browserName=substring.split("/")[0];
            browserVer=substring.split("/")[1];
        }
        else if(userAgent.contains("Firefox")){  //Checking if Firefox
            String substring=userAgent.substring(userAgent.indexOf("Firefox")).split(" ")[0];
            browserName=substring.split("/")[0];
            browserVer=substring.split("/")[1];
        }
        else if(userAgent.contains("MSIE")){ //Checking if Internet Explorer
            String substring=userAgent.substring(userAgent.indexOf("MSIE")).split(";")[0];
            browserName=substring.split(" ")[0];
            browserVer=substring.split(" ")[1];
        }
        else if(userAgent.contains("rv")){ //checking if Internet Explorer 11
     String substring=userAgent.substring(userAgent.indexOf("rv"),userAgent.indexOf(")"));
     browserName="IE";
     browserVer=substring.split(":")[1];
 }
    }
    public String getName(){
        return browserName; //returning browser name
    }
    public String getVersion(){
        return browserVer;  //returning browser version
    }
}
/* Code for JSP(browserDetails.jsp) */
<html>
<head><title>Browser Details</title></head>
<%@ page import="detector.model.BrowserRecognitionModel" %>
<body>
  <h1>Browser Details</h1>
  <%
    BrowserRecognitionModel model=(BrowserRecognitionModel)request.getAttribute("model");
    String browserName=model.getName();
    String version=model.getVersion();
  %>
  <b>Browser Name : </b><%= browserName %></br>
  <b>Browser Version : </b><%= version %>
</body>
</html>
--------------------------------------------------------------------------------------------------------------------------
DOWNLOAD LINKS
--------------------------------------------------------------------------------------------------------------------------
DOWNLOAD the application(rar) from Mediafire
DOWNLOAD the application(rar) from 4shared
DOWNLOAD the application(rar) from Mediafire
DOWNLOAD the application(rar) from 4shared
Monday, October 15, 2012
Today I am going to post a program that will be able to change i.e control the brightness of any image in Java. First the image is read from a file using Java's ImageIO class (in javax.imageio package) as a BufferedImage. A function is written that takes in the image and brightness value as parameter. Inside it an object of RescaleOp class (in java.awt.image package) is created using the brightness value. Then the object's filter(src,dest) method is called and source image is passed (destination is kept null) and the final image developed is returned. This final image is drawn on a JPanel and shown in frame. Also this image is saved in a new file named dest.jpg in jpeg format using ImageIO class. Screenshots of the original and the brightened image is shown below
--------------------------------------------------------------------------------------------------------------------------
import java.io.File;
import java.awt.Graphics;
import java.awt.Graphics2D;
import java.awt.color.ColorSpace;
import javax.swing.JFrame;
import javax.swing.JPanel;
import java.awt.image.BufferedImage;
import java.awt.image.RescaleOp;
import javax.imageio.ImageIO;
@SuppressWarnings("serial")
public class Brighten extends JPanel{
@Override
public void paintComponent(Graphics g){
Graphics2D g2d=(Graphics2D)g;
try{
//reading image data from file
BufferedImage src=ImageIO.read(new File("src.jpg"));
/* passing source image and brightening by 50%-value of 1.0f means original brightness */
BufferedImage dest=changeBrightness(src,1.5f);
//drawing new image on panel
g2d.drawImage(dest,0,0,this);
//writing new image to a file in jpeg format
ImageIO.write(dest,"jpeg",new File("dest.jpg"));
}catch(Exception e){
e.printStackTrace();
}
}
public BufferedImage changeBrightness(BufferedImage src,float val){
RescaleOp brighterOp = new RescaleOp(val, 0, null);
return brighterOp.filter(src,null); //filtering
}
public static void main (String[] args) {
JFrame jf=new JFrame("BRIGHTEN");
Brighten obj=new Brighten();
jf.getContentPane().add(obj);
jf.setVisible(true);
jf.setSize(325,270);
jf.setDefaultCloseOperation(jf.EXIT_ON_CLOSE);
}
}
--------------------------------------------------------------------------------------------------------------------------
DOWNLOAD the source from Mediafire
DOWNLOAD the source from 4shared
--------------------------------------------------------------------------------------------------------------------------
 |
| Original image |
 |
| Brightened by 50% |
--------------------------------------------------------------------------------------------------------------------------
SOURCE CODE
--------------------------------------------------------------------------------------------------------------------------import java.io.File;
import java.awt.Graphics;
import java.awt.Graphics2D;
import java.awt.color.ColorSpace;
import javax.swing.JFrame;
import javax.swing.JPanel;
import java.awt.image.BufferedImage;
import java.awt.image.RescaleOp;
import javax.imageio.ImageIO;
@SuppressWarnings("serial")
public class Brighten extends JPanel{
@Override
public void paintComponent(Graphics g){
Graphics2D g2d=(Graphics2D)g;
try{
//reading image data from file
BufferedImage src=ImageIO.read(new File("src.jpg"));
/* passing source image and brightening by 50%-value of 1.0f means original brightness */
BufferedImage dest=changeBrightness(src,1.5f);
//drawing new image on panel
g2d.drawImage(dest,0,0,this);
//writing new image to a file in jpeg format
ImageIO.write(dest,"jpeg",new File("dest.jpg"));
}catch(Exception e){
e.printStackTrace();
}
}
public BufferedImage changeBrightness(BufferedImage src,float val){
RescaleOp brighterOp = new RescaleOp(val, 0, null);
return brighterOp.filter(src,null); //filtering
}
public static void main (String[] args) {
JFrame jf=new JFrame("BRIGHTEN");
Brighten obj=new Brighten();
jf.getContentPane().add(obj);
jf.setVisible(true);
jf.setSize(325,270);
jf.setDefaultCloseOperation(jf.EXIT_ON_CLOSE);
}
}
--------------------------------------------------------------------------------------------------------------------------
DOWNLOAD LINKS
--------------------------------------------------------------------------------------------------------------------------DOWNLOAD the source from 4shared
--------------------------------------------------------------------------------------------------------------------------
RELATED POSTS
--------------------------------------------------------------------------------------------------------------------------
Monday, October 8, 2012
Today I am going to post a program that will be able to show all the headers associated with a servlet request; Here in the code request object is used to get an enumerations of headers associated with the request of the client. Then with a loop one by one all the headers are extracted and their corresponding values are available using the getHeader(String headername) method. All these headers and their values are sent to the client as a dynamically generated html. Also note that the values will differ according to the browser which has been used to send the request.
Here is the code for you -->
import java.io.PrintWriter;
import java.io.IOException;
import java.util.Enumeration;
import javax.servlet.ServletException;
import javax.servlet.http.HttpServlet;
import javax.servlet.http.HttpServletRequest;
import javax.servlet.http.HttpServletResponse;
import javax.servlet.annotation.WebServlet;
@WebServlet("/header.html")
public class HeaderViewer extends HttpServlet{
public void doGet(HttpServletRequest req,HttpServletResponse res)throws IOException,ServletException{
Enumeration headers=req.getHeaderNames(); /*getting enumerations of all headers */
PrintWriter out=res.getWriter(); //getting writer
out.write("<html><head><title>HeaderViewer</title></head>");
out.write("<body><h1><center>Headers associated with your request</center></h1>");
while(headers.hasMoreElements()){
String header=(String)headers.nextElement(); /*extracting header */
out.write("</br><b>"+header+" : </b>"+req.getHeader(header)); /* sending header name and its value to client */
}
out.write("</body></html>");
out.close();
}
}
 |
| Screenshot of output as seen on Chrome in Windows7 |
import java.io.PrintWriter;
import java.io.IOException;
import java.util.Enumeration;
import javax.servlet.ServletException;
import javax.servlet.http.HttpServlet;
import javax.servlet.http.HttpServletRequest;
import javax.servlet.http.HttpServletResponse;
import javax.servlet.annotation.WebServlet;
@WebServlet("/header.html")
public class HeaderViewer extends HttpServlet{
public void doGet(HttpServletRequest req,HttpServletResponse res)throws IOException,ServletException{
Enumeration headers=req.getHeaderNames(); /*getting enumerations of all headers */
PrintWriter out=res.getWriter(); //getting writer
out.write("<html><head><title>HeaderViewer</title></head>");
out.write("<body><h1><center>Headers associated with your request</center></h1>");
while(headers.hasMoreElements()){
String header=(String)headers.nextElement(); /*extracting header */
out.write("</br><b>"+header+" : </b>"+req.getHeader(header)); /* sending header name and its value to client */
}
out.write("</body></html>");
out.close();
}
}
Sunday, October 7, 2012
Today I am going to post a hello world servlet program that uses latest Servlet3.0 technology. For all new users of this technology, I would like to mention that deploying your web-app has been made easy. With this technology you can use annotations to set the URL of your web-app now, which was only possible through deployment descriptor in their previous versions. So here I will post the simplest code to show how to use this method.
import java.io.*;
import javax.servlet.*;
import javax.servlet.annotation.*;
import javax.servlet.http.*;
/*http://localhost:8080/def/a/b/simple.html is the complete url when your server is running at port 8080 and your app directory is def */
@WebServlet("/a/b/simple.html") //this is relative URL
public class SimpleServlet extends HttpServlet {
@Override
public void doGet(HttpServletRequest req,HttpServletResponse res){
try{
PrintWriter out = res.getWriter(); /* getting writer yo send dynamic data to client */
out.println(
"<html><head><title>Servlet Demo</title></head><body> <h1><center>Hello World</center></h1></body></html>"); //sending html data
out.close(); //closing writer
}catch(Exception e){ e.printStackTrace(); }
}
}
Note that we are not mapping servlet in DD but using annotation for that. The URL we are giving is a relative one and false. Client cannot access the file directly as it is inside WEB-INF directory. Also it is written in such a way that client will think its a static html page whereas it is a dynamically generated html by servlet behind the curtain. So we are achieving url hiding and deployment in a very easier way. So try it out guys.
Thursday, October 4, 2012
Reasons for introducing the concept of packages in Java-->
1 : for better organizing of resources
2 : to avoid class name conflicts i.e. if there were no packages then it wouldn't have been possible to declare duplicate class names;
Convention of declaring packages--> package names are generally given according to reverse domain name. e.g.if your domain is javaingrab.blogspot.com then package is com.blogspot.javaingrab followed by your project and so on. This will prevent package name conflicts.
How to use packages--> First of all you will have to create a directory structure according to packages. e.g. for package com.blogspot.javaingrab directory structure is com/blogspot/javaingrab and so on. There is a keyword in java called package to declare a package. Now package statement should be the first line of your code. take a look at following code
package com.blogspot.javaingrab.xamples;
public class MyClass{
public MyClass(){
Sysytem.out.println("Package Demo");
}
public static void main(String[] args){
new MyClass();
}
}
How to compile with packages--> Generally sources are kept in a separate folder named src and classes in classes directory.Considering above example the directory would be like this /project/classes and /project/src/ and within src it will be src/com/blogspot/javaingrab/xamples and inside it will be MyClass.java file. Now if you are compiling from project directory command will be
C:\project javac -d classes -cp src src\com\blogspot\javaingrab\xamples\MyClass.java
-d switch : it is optional and is used if you want to place class files in a separate directory. This helps in automatic creation of directories according to your packages.
-cp switch : it means classpath. This is necessary only when your source requires other classes which may or may not reside in the same packages. Using this you can compile a particular class even if the dependent class resides in a different drive.
How to run with packages--> While running you will have to give the -cp switch followed by the dependent class file directory and then the fully qualified class name with package which you want to run. for the above class the command should be
C:\project java -cp classes com.blogspot.javaingrab.xamples.MyClass
WARNING : Do not mention about any package named directory as java compiler or JVM searches for the particular package inside the classpath. Yf you do this then it will be disastrous,so be careful.
Wednesday, September 5, 2012
Today I am going to post how the access-specifier protected is related with inheritance in Java. It is less restricted than default but restricted than public.
How protected works and is different from default:Default and protected behavior differ only when we talk about subclasses.If the
protected keyword is used to define a member,any subclass of the class declaring the member can access it through inheritance.It doesn't matter if the superclass and subclass are in different packages,the protected superclass member is still visible to the subclass in a very specific way.This is in contrast to the default behavior,which doesn't allow a subclass to access a superclass member unless the subclass is in the same package as the superclass.
Whereas default access doesn't extend any special consideration to subclasses (you're either in the package or you're not), the protected modifier respects the parent-child relationship, even when the child class moves away (and joins a new package). So, when you think of default access, think package restriction. No exceptions. A class with a protected member is marking that member as having package-level access for all classes, but with a special exception for subclasses outside the package. But what does it mean for a subclass-outside-the-package to have access to a superclass (parent) member? It means the subclass inherits the member. It does not, however, mean the subclass-outside-the-package can access the member using a reference to an instance of the superclass. In other words, protected = inheritance. Protected does not mean that the subclass can treat the protected superclass member as though it were public. So if the subclass-outside-the-package gets a reference to the superclass (by, for example, creating an instance of the superclass somewhere in the subclass' code), the subclass cannot use the dot operator on the superclass reference to access the protected member. To a subclass-outside-the-package, a protected member might as well be default (or even private), when the subclass is using a reference to the superclass. The subclass can see the protected member only through inheritance.
package package1;
public class Parent {
protected int x = 20; // protected access
}
package package2;
import package1.Parent;
class Child extends Parent {
public void testIt() {
System.out.println("x is " + x); // No problem;Child inherits x
Parent p = new Parent(); // Can we access x using p reference?
System.out.println("X in parent is " + p.x); // Compiler error!
}
}
The last line will give an error as following
package2/Child.java: x has protected access in package1.Parent
System.out.println("X in parent is " + p.x);
1 error
Hope this helps. Keep looking for more posts.
How protected works and is different from default:Default and protected behavior differ only when we talk about subclasses.If the
protected keyword is used to define a member,any subclass of the class declaring the member can access it through inheritance.It doesn't matter if the superclass and subclass are in different packages,the protected superclass member is still visible to the subclass in a very specific way.This is in contrast to the default behavior,which doesn't allow a subclass to access a superclass member unless the subclass is in the same package as the superclass.
Whereas default access doesn't extend any special consideration to subclasses (you're either in the package or you're not), the protected modifier respects the parent-child relationship, even when the child class moves away (and joins a new package). So, when you think of default access, think package restriction. No exceptions. A class with a protected member is marking that member as having package-level access for all classes, but with a special exception for subclasses outside the package. But what does it mean for a subclass-outside-the-package to have access to a superclass (parent) member? It means the subclass inherits the member. It does not, however, mean the subclass-outside-the-package can access the member using a reference to an instance of the superclass. In other words, protected = inheritance. Protected does not mean that the subclass can treat the protected superclass member as though it were public. So if the subclass-outside-the-package gets a reference to the superclass (by, for example, creating an instance of the superclass somewhere in the subclass' code), the subclass cannot use the dot operator on the superclass reference to access the protected member. To a subclass-outside-the-package, a protected member might as well be default (or even private), when the subclass is using a reference to the superclass. The subclass can see the protected member only through inheritance.
 |
| Showing accessibility of protected |
The code below will explain it further
package package1;
public class Parent {
protected int x = 20; // protected access
}
package package2;
import package1.Parent;
class Child extends Parent {
public void testIt() {
System.out.println("x is " + x); // No problem;Child inherits x
Parent p = new Parent(); // Can we access x using p reference?
System.out.println("X in parent is " + p.x); // Compiler error!
}
}
The last line will give an error as following
package2/Child.java: x has protected access in package1.Parent
System.out.println("X in parent is " + p.x);
1 error
Hope this helps. Keep looking for more posts.
Sunday, September 2, 2012
The answer to this question is NO. You cannot override static methods in Java. In order to show this,have a look at code below :
public class SuperClass{
public static void show(){
System.out.println("Static SuperClass Method");
}
}
public class SubClass extends SuperClass{
public static void show(){
System.out.println("Static SubClass Method");
}
}
public class Demo{
public static void main(String[] args){
SuperClass ob1=new SuperClass();
SuperClass ob2=new SubClass();
SubClass ob3=new SubClass();
ob1.show();
ob2.show();
ob3.show();
}
}
The above code will give output as below :
Static SuperClass Method
Static SuperClass Method
Static SubClass Method
If the static method had been overridden then the second line of the output would have been same as that of third line. So the method has not been overridden and a brand new method has been created in sub class. To understand it more deeply just rewrite the sub class as shown below :
public class SubClass extends SuperClass{
@Override
public static void show(){
System.out.println("Static SubClass Method");
}
}
If you write the latter one you won't be able to compile it. The compiler will tell that there is no such method in super class. So it is recommended that you always use the @Override annotation to verify that whether you have correctly overridden the method or not. So instead of getting an unexpected output you will get a compile time error which is better and easy for debugging. This is possible only with jdk1.5.0 and above.
REASON : The reason why static methods cannot be overridden is that the concept of inheritance is a concept of object. Now static methods and variables are class specific features and not object specific while non-static things are object specific features and for that reason only you can access static things directly using class name. Though static things can be accessed through objects yet they are related to classes and bound with them. Many of you may confuse with this. That's why C# does not allow you to access any static things with objects and thus have removed this confusing feature of Java.
Monday, August 13, 2012
AWT:
Pros
1. Speed: use of native peers speeds component performance.
2. Applet Portability: most Web browsers support AWT classes so
AWT applets can run without the Java plugin.
3. Look and Feel: AWT components more closely reflect the look
and feel of the OS they run on.
Cons
1. Portability: use of native peers creates platform specific
limitations. Some components may not function at all on some
platforms.
2. Third Party Development: the majority of component makers,
including Borland and Sun, base new component development on
Swing components. There is a much smaller set of AWT
components available, thus placing the burden on the programmer
to create his or her own AWT-based components.
3. Features: AWT components do not support features like icons and tool-tips.
Swing:
Pros
1. Portability: Pure Java design provides for fewer platform specific
limitations.
2. Behavior: Pure Java design allows for a greater range of behavior
for Swing components since they are not limited by the native peers that AWT uses.
3. Features: Swing supports a wider range of features like icons and
pop-up tool-tips for components.
4. Vendor Support: Swing development is more active. Sun puts
much more energy into making Swing robust.
5. Look and Feel: The pluggable look and feel lets you design a
single set of GUI components that can automatically have the look
and feel of any OS platform (Microsoft Windows, Solaris,
Macintosh, etc.). It also makes it easier to make global changes to
your Java programs that provide greater accessibility (like picking
a hi-contrast color scheme or changing all the fonts in all dialogs,
etc.).
Cons
1. Applet Portability: Most Web browsers do not include the Swing
classes, so the Java plugin must be used.
2. Performance: Swing components are generally slower and buggier than AWT, due to both the fact that they are pure Java and to video issues on various platforms. Since Swing components handle their own painting (rather than using native API's like DirectX on Windows) you may run into graphical glitches.
3. Look and Feel: Even when Swing components are set to use the
look and feel of the OS they are run on, they may not look like
their native counterparts.
Pros
1. Speed: use of native peers speeds component performance.
2. Applet Portability: most Web browsers support AWT classes so
AWT applets can run without the Java plugin.
3. Look and Feel: AWT components more closely reflect the look
and feel of the OS they run on.
Cons
1. Portability: use of native peers creates platform specific
limitations. Some components may not function at all on some
platforms.
2. Third Party Development: the majority of component makers,
including Borland and Sun, base new component development on
Swing components. There is a much smaller set of AWT
components available, thus placing the burden on the programmer
to create his or her own AWT-based components.
3. Features: AWT components do not support features like icons and tool-tips.
Swing:
Pros
1. Portability: Pure Java design provides for fewer platform specific
limitations.
2. Behavior: Pure Java design allows for a greater range of behavior
for Swing components since they are not limited by the native peers that AWT uses.
3. Features: Swing supports a wider range of features like icons and
pop-up tool-tips for components.
4. Vendor Support: Swing development is more active. Sun puts
much more energy into making Swing robust.
5. Look and Feel: The pluggable look and feel lets you design a
single set of GUI components that can automatically have the look
and feel of any OS platform (Microsoft Windows, Solaris,
Macintosh, etc.). It also makes it easier to make global changes to
your Java programs that provide greater accessibility (like picking
a hi-contrast color scheme or changing all the fonts in all dialogs,
etc.).
Cons
1. Applet Portability: Most Web browsers do not include the Swing
classes, so the Java plugin must be used.
2. Performance: Swing components are generally slower and buggier than AWT, due to both the fact that they are pure Java and to video issues on various platforms. Since Swing components handle their own painting (rather than using native API's like DirectX on Windows) you may run into graphical glitches.
3. Look and Feel: Even when Swing components are set to use the
look and feel of the OS they are run on, they may not look like
their native counterparts.
Tuesday, August 7, 2012
This post is for all who has just started learning java or planning to do so. If you are from a C/C++ background then you will see that you didn't have to do all these things. You only had to install TurboC. But in Java it is necessary to set the path as without it you cannot compile or run a java program from command prompt if your source file resides in a different location as that of the compiler. At that situation windows won't be able to recognize javac as a command. Many of you will think that they can compile or run from an IDE like Eclipse,NetBeans,JCreator or BlueJ. But you will understand later that many things can't be done from here which can be done from your command prompt. Follow these steps carefully :
1 : Download and install the latest version of jdk(i.e. jdk7) in order to keep yourself always updated.
2 : Go to the location where you have installed jdk and look for bin folder. the path may look like this C:\Program Files\Java\jdk1.7.0\bin. Just copy this path from the location bar.
 3 : Now right click on My Computer and select Properties. It will open the system window.
 4 : Now select Advanced System Settings from the window as shown
 5 : Now select Environment variables
 6 : Now look for Path under System Variable. Either double click it or select edit after choosing it.
 7 : Now go the beginning and paste the path that you have copied earlier and then give a semi-colon.
WARNING : Do not change any other things and don't forget to give the semi-colon as either of this will cause system problems.
 8 : Now press OK and give Administrator permission while doing it. You will have to press OK for two times to close the other dialogs that were already open. That's it. You have successfully set the path and compile from anywhere with javac command. If still windows can't recognize the javac command then you have done some mistake in the procedure. Plz check it.
1 : Download and install the latest version of jdk(i.e. jdk7) in order to keep yourself always updated.
2 : Go to the location where you have installed jdk and look for bin folder. the path may look like this C:\Program Files\Java\jdk1.7.0\bin. Just copy this path from the location bar.


WARNING : Do not change any other things and don't forget to give the semi-colon as either of this will cause system problems.

Saturday, August 4, 2012
#include directive makes the compiler go to the C/C++ standard library and copy the code from the header files into the program. As a result, the program size increases, thus wasting memory and processor’s time.
import statement makes the JVM go to the Java standard library, execute the code there , and substitute the result into the program. Here, no code is copied and hence no waste of memory or processor’s time.hence import is an efficient mechanism than #include.
import statement makes the JVM go to the Java standard library, execute the code there , and substitute the result into the program. Here, no code is copied and hence no waste of memory or processor’s time.hence import is an efficient mechanism than #include.
JIT compiler is a part of Java Virtual Machine(JVM) that speeds up the execution of a Java program
It is not possible to declare a class private in Java. For example you cannot write a class as shown below
private class Demo{}
If you write this you will get a compile error as shown below
 This is because it is not available to java compiler and hence a compile time error occurs, But inner classes can be declared as private.
private class Demo{}
If you write this you will get a compile error as shown below

Friday, August 3, 2012
Today I am going to post a program that will create bubbles or a bubbling effect. Here I have used Ellipse2D class. A method calculates random coordinates,sizes and strokes of the ellipses. The size of the ellipses goes on increasing till it reaches its maximum value after which it starts from beginning. Each ellipse reaches its maximum size at different times. Each repainting is done after sleep of every 50ms. Related video is given below
Here is the code for you
import java.awt.*;
import java.awt.geom.Ellipse2D;
import javax.swing.*;
public class Bubbles extends JPanel{
private Ellipse2D.Float[] ellipses;
private double esize[];
private float estroke[];
private final double MAX_SIZE=40;
public Bubbles() {
ellipses = new Ellipse2D.Float[75];
esize = new double[ellipses.length];
estroke = new float[ellipses.length];
for (int i = 0; i < ellipses.length; i++) {
ellipses[i] = new Ellipse2D.Float();
getRandomXY(i, 20 * Math.random(),getWidth()-60,getHeight()-60);
}
}
public void build(){
while(true){
for (int i = 0; i < ellipses.length; i++) {
estroke[i] += 0.025f; //increasing stroke
esize[i]++; //increasing size
if (esize[i] > MAX_SIZE) //new values if reaches maximum
getRandomXY(i, 20 * Math.random(),getWidth()-60,getHeight()-60);
else
ellipses[i].setFrame(ellipses[i].getX(), ellipses[i].getY(),
esize[i], esize[i]);
}
repaint(); //repainting
try {
Thread.sleep(50); //sleeping
}catch (Exception ex) {}
}
}
public void getRandomXY(int i, double size, int w, int h) {
esize[i] = size;
estroke[i] = 1.0f; //setting size.strokes,coordinates
double x = Math.random() * (getWidth()-(MAX_SIZE/2));
double y = Math.random() * (getHeight()-(MAX_SIZE/2));
ellipses[i].setFrame(x, y, size, size); //setting ellipse
}
@Override
public void paintComponent(Graphics g){
Graphics2D g2d=(Graphics2D)g;
//clearing previous trails
g2d.setColor(Color.black);
g2d.fillRect(0,0,this.getWidth(),this.getHeight());
for (int i = 0; i < ellipses.length; i++) {
g2d.setStroke(new BasicStroke(estroke[i]));
int red=(int)(Math.random()*256);
int green=(int)(Math.random()*256);
int blue=(int)(Math.random()*256);
g2d.setColor(new Color(red,green,blue));
g2d.draw(ellipses[i]); //drawing ellipses
}
}
public static void main(String[] args) {
JFrame f=new JFrame("Bubbles");
Bubbles b=new Bubbles();
f.getContentPane().add(b);
f.setSize(350,350);
f.setVisible(true);
f.setLocationRelativeTo(null);
f.setDefaultCloseOperation(f.EXIT_ON_CLOSE);
b.build();
}
}You can also download source file from below links
DOWNLOAD the source from Mediafire
DOWNLOAD the source from 4shared
Thursday, August 2, 2012
Today I will post how to continously rotate a text i.e string in Java Graphics2D. As you know that there are 4 types of transformation available in Java which are translation,rotation,scaling and shearing. Here I will use translation and rotation for this purpose. The text will be placed exactly at the center of the screen such that mid-point of text and screen coincide. Then the text will be rotated with screen center as the anchor point of rotation. Video of output is given here
Here is the code for you ->
import java.awt.*;
import java.awt.geom.*;
import java.awt.font.*;
import javax.swing.*;
public class RotateText extends JPanel{
static int angdeg=0;
@Override
public void paint(Graphics g){
Graphics2D g2d = (Graphics2D) g;
g2d.setRenderingHint(RenderingHints.KEY_ANTIALIASING, RenderingHints.VALUE_ANTIALIAS_ON);
g2d.setColor(Color.white); //to remove trail of painting
g2d.fillRect(0,0,getWidth(),getHeight());
Font font = new Font("serif",Font.BOLD,50);
g2d.setFont(font); //setting font of surface
FontRenderContext frc = g2d.getFontRenderContext();
TextLayout layout = new TextLayout("JAVA", font, frc);
//getting width & height of the text
double sw = layout.getBounds().getWidth();
double sh = layout.getBounds().getHeight();
//getting original transform instance
AffineTransform saveTransform=g2d.getTransform();
g2d.setColor(Color.black);
Rectangle rect = this.getBounds();
//drawing the axis
g2d.drawLine((int)(rect.width)/2,0,(int)(rect.width)/2,rect.height);
g2d.drawLine(0,(int)(rect.height)/2,rect.width,(int)(rect.height)/2);
AffineTransform affineTransform = new AffineTransform(); /*creating instance set the translation to the mid of the component*/
affineTransform.setToTranslation((rect.width)/2,(rect.height)/2);
//rotate with the anchor point as the mid of the text
affineTransform.rotate(Math.toRadians(angdeg), 0, 0);
g2d.setTransform(affineTransform);
g2d.drawString("JAVA",(int)-sw/2,(int)sh/2);
g2d.setTransform(saveTransform); //restoring original transform
}
public static void main(String[] args) throws Exception{
JFrame frame = new JFrame("Rotated text");
RotateText rt=new RotateText();
frame.add(rt);
frame.setSize(500, 500);
frame.setDefaultCloseOperation(JFrame.EXIT_ON_CLOSE);
frame.setLocationRelativeTo(null);
frame.setVisible(true);
while(true){
Thread.sleep(10); //sleeping then increasing angle by 5
angdeg=(angdeg>=360)?0:angdeg+5; //
rt.repaint(); //repainting the surface
}
}
}
You can also download full source from below links
DOWNLOAD the source from Mediafire
DOWNLOAD the source from 4shared
Wednesday, August 1, 2012
Today I am going to post a program to draw partially transparent image using Graphics2D in Java. In this example I am going to paint the background first by drawing ellipses with different colors .The image is broken into tiles using BufferedImage and each tile is given a separate transparency(alpha value) and then drawn above the background. Screenshots are given below
--------------------------------------------------------------------------------------------------------------------------
import java.awt.*;
import java.awt.geom.*;
import java.awt.image.BufferedImage;
import java.io.*;
import javax.swing.*;
import com.sun.image.codec.jpeg.*;
public class TransparentImage extends JPanel {
private BufferedImage mImage;
public static void main(String[] args) {
try {
String filename = "Image.jpeg";
JFrame f = new JFrame("TransparentImage v1.0");
TransparentImage showOff = new TransparentImage(filename);
f.getContentPane().add(showOff);
f.setSize(f.getPreferredSize());
f.setResizable(false);
f.setDefaultCloseOperation(f.EXIT_ON_CLOSE);
f.setVisible(true);
}catch (Exception e) {
System.out.println(e);
System.exit(0);
}
}
public TransparentImage(String filename) throws Exception{
// Get the specified image.
InputStream in = getClass().getResourceAsStream(filename);
JPEGImageDecoder decoder = JPEGCodec.createJPEGDecoder(in);
mImage = decoder.decodeAsBufferedImage();
in.close();
// Set our size to match the image's size.
setPreferredSize(new Dimension((int)mImage.getWidth(), (int)mImage.getHeight()));
}
@Override
public void paintComponent(Graphics g) {
Graphics2D g2 = (Graphics2D)g;
// Turn on antialiasing
g2.setRenderingHint(RenderingHints.KEY_ANTIALIASING,RenderingHints.VALUE_ANTIALIAS_ON);
drawBackground(g2);
drawImageTile(g2);
}
private void drawBackground(Graphics2D g2) {
// Draw circles of different colors
int side = 45;
int width = getSize().width;
int height = getSize().height;
Color[] colors = { Color.yellow, Color.cyan, Color.orange,
Color.pink, Color.magenta, Color.lightGray };
for (int y = 0; y < height; y += side) {
for (int x = 0; x < width; x += side) {
Ellipse2D ellipse = new Ellipse2D.Float(x, y, side, side);
int index = (x + y) / side % colors.length;
g2.setPaint(colors[index]);
g2.fill(ellipse);
}
}
}
private void drawImageTile(Graphics2D g2) {
int side = 36;
int width = mImage.getWidth();
int height = mImage.getHeight();
for (int y = 0; y < height; y += side) {
for (int x = 0; x < width; x += side) {
// Calculate an appropriate transparency value
float xBias = (float)x / (float)width;
float yBias = (float)y / (float)height;
float alpha = 1.0f - Math.abs(xBias - yBias);
g2.setComposite(AlphaComposite.getInstance(
AlphaComposite.SRC_OVER, alpha));
// Draw the subimage
int w = Math.min(side, width - x);
int h = Math.min(side, height - y);
BufferedImage tile = mImage.getSubimage(x, y, w, h);
g2.drawImage(tile, x, y, null);
}
}
// Reset the composite.
g2.setComposite(AlphaComposite.getInstance(AlphaComposite.SRC_OVER));
}
}
NOTE : in order to run this program perfectly you must have a Image.jpeg file in the same directory as that of your java file.
--------------------------------------------------------------------------------------------------------------------------
Change brightness of image using RescaleOp
 |
| Original Image |
| Transparent Image |
SOURCE CODE
--------------------------------------------------------------------------------------------------------------------------import java.awt.*;
import java.awt.geom.*;
import java.awt.image.BufferedImage;
import java.io.*;
import javax.swing.*;
import com.sun.image.codec.jpeg.*;
public class TransparentImage extends JPanel {
private BufferedImage mImage;
public static void main(String[] args) {
try {
String filename = "Image.jpeg";
JFrame f = new JFrame("TransparentImage v1.0");
TransparentImage showOff = new TransparentImage(filename);
f.getContentPane().add(showOff);
f.setSize(f.getPreferredSize());
f.setResizable(false);
f.setDefaultCloseOperation(f.EXIT_ON_CLOSE);
f.setVisible(true);
}catch (Exception e) {
System.out.println(e);
System.exit(0);
}
}
public TransparentImage(String filename) throws Exception{
// Get the specified image.
InputStream in = getClass().getResourceAsStream(filename);
JPEGImageDecoder decoder = JPEGCodec.createJPEGDecoder(in);
mImage = decoder.decodeAsBufferedImage();
in.close();
// Set our size to match the image's size.
setPreferredSize(new Dimension((int)mImage.getWidth(), (int)mImage.getHeight()));
}
@Override
public void paintComponent(Graphics g) {
Graphics2D g2 = (Graphics2D)g;
// Turn on antialiasing
g2.setRenderingHint(RenderingHints.KEY_ANTIALIASING,RenderingHints.VALUE_ANTIALIAS_ON);
drawBackground(g2);
drawImageTile(g2);
}
private void drawBackground(Graphics2D g2) {
// Draw circles of different colors
int side = 45;
int width = getSize().width;
int height = getSize().height;
Color[] colors = { Color.yellow, Color.cyan, Color.orange,
Color.pink, Color.magenta, Color.lightGray };
for (int y = 0; y < height; y += side) {
for (int x = 0; x < width; x += side) {
Ellipse2D ellipse = new Ellipse2D.Float(x, y, side, side);
int index = (x + y) / side % colors.length;
g2.setPaint(colors[index]);
g2.fill(ellipse);
}
}
}
private void drawImageTile(Graphics2D g2) {
int side = 36;
int width = mImage.getWidth();
int height = mImage.getHeight();
for (int y = 0; y < height; y += side) {
for (int x = 0; x < width; x += side) {
// Calculate an appropriate transparency value
float xBias = (float)x / (float)width;
float yBias = (float)y / (float)height;
float alpha = 1.0f - Math.abs(xBias - yBias);
g2.setComposite(AlphaComposite.getInstance(
AlphaComposite.SRC_OVER, alpha));
// Draw the subimage
int w = Math.min(side, width - x);
int h = Math.min(side, height - y);
BufferedImage tile = mImage.getSubimage(x, y, w, h);
g2.drawImage(tile, x, y, null);
}
}
// Reset the composite.
g2.setComposite(AlphaComposite.getInstance(AlphaComposite.SRC_OVER));
}
}
NOTE : in order to run this program perfectly you must have a Image.jpeg file in the same directory as that of your java file.
--------------------------------------------------------------------------------------------------------------------------
RELATED POSTS
--------------------------------------------------------------------------------------------------------------------------Change brightness of image using RescaleOp
Monday, July 30, 2012
Radix Sort is a type of bucket sort. This type of sort is based on radix i.e. 10 for decimal numbers and 26 for alphabets. This technique is very useful in sorting words alphabetically. Arrays are sorted in a total of "d" passes where "d" is the number of digits of highest number..
For decimal numbers : In first pass array is sorted according to units digit , then in next pass sorted according to tens digit and so on.This process goes on till all the digits of highest numbers are traversed.
For words : In first pass array is sorted according to first letter , and in second pass second character is considered and so on.
Here is the code for you -->
import java.io.*;
public class Radix_Sort {
public void sort(int a[],int rad,int max){
int tmp[][]=new int[a.length][10];
for(int i=0;i<max;i++){
int c=0;
for (int j=0;j<a.length;j++)
for(int k=0;k<rad;k++)
tmp[j][k]=0;
for(int k=0;k<a.length;k++){
int d=(int)((a[k]/Math.pow(10,i))%10);
tmp[k][d]=a[k];
}
for (int j=0;j<rad;j++)
for(int k=0;k<a.length;k++)
if(tmp[k][j]!=0)
a[c++]=tmp[k][j];
}
disp(a);
}
public void input()throws Exception{
BufferedReader br=new BufferedReader(new InputStreamReader(System.in));
System.out.print("Enter array size : ");
int n=Integer.parseInt(br.readLine());
int a[]=new int[n];
System.out.println("Enter elements in array ------->");
int max=0;
for (int i = 0; i<n; i++) {
System.out.print("Enter number : ");
a[i]=Integer.parseInt(br.readLine());
if(a[i]>max)
max=a[i];
}
sort(a,10,digit_count(max));
}
int digit_count(int n){
int d=0;
while (n!=0) {
d++;
n/=10;
}
return d;
}
public void disp(int a[]){
System.out.println("\nArray after sorting -------->");
for (int i = 0; i<a.length; i++)
System.out.print(a[i]+" ");
}
public static void main(String[] args) throws Exception{
new Radix_Sort().input();
}
}
You can also download the source from below links :
DOWNLOAD source JAVA file from MediaFire
DOWNLOAD the JAVA file from 4shared
Sunday, July 29, 2012
It is not allowed since static nature of the method will give permission to access it directly by class name only. But contrarily abstract nature will prohibit it from doing so. This results in a conflicting nature (based on meaning of two modifiers) of the method. Due to this reason Java does not allow you to declare a method both static and abstract. If you try to do this you will get a compile error as illegal combination of modifiers : abstract and static.
Saturday, July 28, 2012
An abstract class is one which cannot be instantiated. Its properties and characteristics cannot be used until and unless it is not inherited by a concrete class. So in order to use such type of classes you will have to extend that class and override its methods.
A final class is one that cannot be inherited i.e. a class defined as final cannot be extended and redefined using the software reusability concept of inheritance.
Now if you try to combine both of these two things, then the class declared final and abstract cannot be inherited as being declared final and since it is abstract we cannot use it directly by creating its object. Hence such a class is of no use and makes no sense at all. For this reason only it is not possible to declare a class both final and abstract.
Friday, July 27, 2012
A method is a function that is written in a class. We do not have functions in java; instead we have methods. This means whenever a function is written in java,it should be written inside the class only. But if we take C++, we can write the functions inside as well as outside the class . So in C++, they are called member functions and not methods.
As you know C/C++ supports pointers. But Java doesn't. This is because of the following reasons :
1) Pointers can result in a crash of your program. So it helps in stabilizing yor code in Java without pointers.
2) Pointers can cause programmers to become confused.
3) Java was developed to make system more secure. So keeping security in mind it was decided to omit pointers as pointers can be used very efficiently to create VIRUS/Malware programs.
In Java program execution starts from main method. And the main method should look like this public static void main(String[] args). Here it is declared static. This is due to following reasons :
1) It can be called directly by the class name without creating its instance.
2) If the class containing main have more than one constructor then JVM won't be able to understand which constructor to use while creating the object.
3) Again if there is a parameterized constructor in the class containing main then also JVM won't understand what value to pass while creating the object.
Thanks to all of you who have supported me in past. Keeping your request I have opened this blog to meet your needs. Hope you will like it and give important suggestions to carry on with my work
Subscribe to:
Posts
(Atom)
Popular Posts
-
 Today I will show you how you can implement Bankers algorithm in Java. The Banker's algorithm is a resource allocation and deadlock a...
 -
------------------------- UPDATE ------------------------- I have updated the code on request of some followers so that they can directly...
-
 Today I am going to show how to convert a postfix expression to an infix expression using stack in Java. In an earlier post here we ...
 -
 Today in this article I will tell you how to convert an infix expression to postfix expression using stack. This is an important applicat...
 -
 --------------------UPDATE------------------- I have updated my post so that now it can detect IE 11. This modification was necessary as t...
 -
 Today I am going to show you how you can generate and validate captcha. A CAPTCHA (an acronym for "Completely Automated Public Turin...
 -
 Today I am going to post a program that will be able to produce all the mColorings of a given graph G. What is mColoring : The problem st...
 -
 Today in this article I will show you how to create or develop a Tower of Hanoi game in Java. The Tower of Hanoi is a famous problem tha...