Showing posts with label Graphics2D-Images. Show all posts
Showing posts with label Graphics2D-Images. Show all posts
Sunday, May 4, 2014
To day in this article I will tell you how to resize or scale an image in Java. Many times while developing an application you maya need this. Most often you may require to create a thumbnail of an image in most web applications. This tutorial will guide you describing each steps in detail.
resizeImageWithHints() : This is a slightly modified version of the above method. Here rendering hints and alpha composite are added to the destination image as shown below
scaleImage() : This method takes input a source image and the scale factor varying from 0 to 1. The most important feature of this method is that it reserves i.e. maintains the aspect ratio of original image. Here an AffineTransform instance is created and the image is drwan with that instance
DOWNLOAD the source from Mediafire
DOWNLOAD the source from 4shared
- First read an image from file or URL using ImageIO
- Now create a BufferedImage with specified width, height and image type
- Obtain a Graphics2D object from the destination object create in earlier step
- Draw the original image using the Graphics object
- Dispose the Graphics object
- Return or save the final image
Here in our example we will have a class with 3 methods.
 |
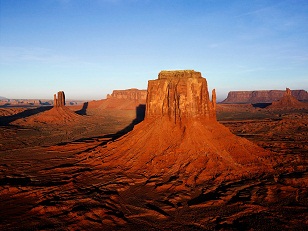
| Original image (930 x 520) to be resized or scaled |
- resizeImage() : This method takes in a source image, the width and height of destination image. This is most simple method and follows the steps mentioned above

Image resized (100 x 100) without hints
BufferedImage dest = new BufferedImage(width, height, BufferedImage.TYPE_INT_RGB);
Graphics2D g2d = dest.createGraphics();
g2d.drawImage(src, 0, 0, width, height, null);
g2d.dispose();
return dest;
 |
| Image resized (100 x 100) with hints |
g2d.setComposite(AlphaComposite.Src);
g2d.setRenderingHint(RenderingHints.KEY_INTERPOLATION, RenderingHints.VALUE_INTERPOLATION_BILINEAR);
g2d.setRenderingHint(RenderingHints.KEY_RENDERING, RenderingHints.VALUE_RENDER_QUALITY);
g2d.setRenderingHint(RenderingHints.KEY_ANTIALIASING, RenderingHints.VALUE_ANTIALIAS_ON);
 |
| Image scaled = 0.3 (279 x 156) |
AffineTransform at = AffineTransform.getScaleInstance(scale, scale);
g2d.drawRenderedImage(src, at);
-------------------------------------------------------------------------------------------------------------------------
Java Source Code
-------------------------------------------------------------------------------------------------------------------------import java.awt.AlphaComposite;
import java.awt.Graphics2D;
import java.awt.RenderingHints;
import java.awt.geom.AffineTransform;
import java.awt.image.BufferedImage;
import java.io.File;
import javax.imageio.ImageIO;
public class ImageResizer {
/**
* Resizes an image without rendering hints depending on input width, height
* @param src source image to be resized
* @param width width of destination image
* @param height height of destination image
* @return resized image
*/
public BufferedImage resizeImage(BufferedImage src,int width,int height){
BufferedImage dest = new BufferedImage(width, height, BufferedImage.TYPE_INT_RGB);
Graphics2D g2d = dest.createGraphics();
g2d.drawImage(src, 0, 0, width, height, null);
g2d.dispose();
return dest;
}
/**
* Resizes an image with rendering hints depending on input width, height
* @param src source image to be resized
* @param width width of destination image
* @param height height of destination image
* @return resized image
*/
public BufferedImage resizeImageWithHints(BufferedImage src,int width,int height){
BufferedImage dest = new BufferedImage(width, height, src.getType());
Graphics2D g2d = dest.createGraphics();
g2d.setComposite(AlphaComposite.Src);
g2d.setRenderingHint(RenderingHints.KEY_INTERPOLATION, RenderingHints.VALUE_INTERPOLATION_BILINEAR);
g2d.setRenderingHint(RenderingHints.KEY_RENDERING, RenderingHints.VALUE_RENDER_QUALITY);
g2d.setRenderingHint(RenderingHints.KEY_ANTIALIASING, RenderingHints.VALUE_ANTIALIAS_ON);
g2d.drawImage(src, 0, 0, width, height, null);
g2d.dispose();
return dest;
}
/**
* Scales an image depending on sclae factor and maintains
* the aspect ratio of original image
* @param src source image to be scaled
* @param scale scale factor xscale = yscale
* @return scaled image
*/
public BufferedImage scaleImage(BufferedImage src, double scale){
int w = (int)(src.getWidth()*scale);
int h = (int)(src.getHeight()*scale);
BufferedImage dest = new BufferedImage(w, h, BufferedImage.TYPE_INT_RGB);
Graphics2D g2d = dest.createGraphics();
AffineTransform at = AffineTransform.getScaleInstance(scale, scale);
g2d.drawRenderedImage(src, at);
return dest;
}
public static void main(String... args) throws Exception {
ImageResizer resizer = new ImageResizer();
BufferedImage src = ImageIO.read(new File("original.jpg"));
BufferedImage dest = resizer.resizeImage(src, 100, 100);
ImageIO.write(dest, "jpeg", new File("dest-resize.jpg"));
dest = resizer.resizeImageWithHints(src, 100, 100);
ImageIO.write(dest, "jpeg", new File("dest-resize-hints.jpg"));
dest = resizer.scaleImage(src, 0.3);
ImageIO.write(dest, "jpeg", new File("dest-scale.jpg"));
}
}
-------------------------------------------------------------------------------------------------------------------------
Download Links
-------------------------------------------------------------------------------------------------------------------------DOWNLOAD the source from Mediafire
DOWNLOAD the source from 4shared
Thursday, June 13, 2013
Today I am going to show you how you can perform edge detection on any image using Java. Here we will use the convolution operator to perform this. But for this we need a kernel to perform this operation. But before that we will first give a breif description about this.
ConvolveOp class : ConvolveOp is one of the most versatile image operators in the 2D API. It represents a spatial convolution, which is a fancy mathematical term that means that the color of each destination pixel is determined by combining the colors of the corresponding source pixel and its neighbors. A convolution operator can be used to blur or sharpen an image, among other things.
ConvolveOp class : ConvolveOp is one of the most versatile image operators in the 2D API. It represents a spatial convolution, which is a fancy mathematical term that means that the color of each destination pixel is determined by combining the colors of the corresponding source pixel and its neighbors. A convolution operator can be used to blur or sharpen an image, among other things.
Kernel class : The convolution operator uses a kernel to specify how a source pixel and its neighbors are combined. A kernel is simply a matrix, where the center of the matrix represents the source pixel and the other elements correspond to the neighboring source pixels. The destination color is calculated by multiplying each pixel color by its corresponding kernel coefficient and adding the results together.
How the operation will be performed - We will first read an image using read() method of ImageIO as BufferedImage. Next pass this to a function edgeDetect() where the operation will be carried out. Here we will first create a 3x3 array for kernel whose values add upto less than 1, which means that the image that will be produced will be darker. Next we will create the convolution operator creating ConvolveOp instance using the Kernel. Next we will call filter() method to perform the operation.
Screenshots of the images
 |
| Original Image |
 |
| Image after Edge Detection |
--------------------------------------------------------------------------------------------------------------------------
Java Source Code
--------------------------------------------------------------------------------------------------------------------------
import java.awt.image.BufferedImage;
import java.awt.image.ConvolveOp;
import java.awt.image.Kernel;
import java.io.File;
import javax.imageio.ImageIO;
public class EdgeDetection {
public BufferedImage detectEdge(BufferedImage src){
//kernel for edge detection adding upto less than 1
float edgeArr[]={0,-1,0,-1,4,-1,0,-1,0};
//creating the convolution operator
ConvolveOp edgeOp=new ConvolveOp(new Kernel(3,3,edgeArr),ConvolveOp.EDGE_NO_OP,null);
return edgeOp.filter(src, null); //operating on image
}
public static void main(String[] args)throws Exception {
EdgeDetection obj=new EdgeDetection();
BufferedImage src=ImageIO.read(new File("src_edge.jpg")),
dest=obj.detectEdge(src); //edge detection
ImageIO.write(dest, "jpeg",new File("dest_edge.jpg"));
}
}
--------------------------------------------------------------------------------------------------------------------------
Download Links
--------------------------------------------------------------------------------------------------------------------------
Hope this helps. Keep coding :)
Tuesday, June 11, 2013
Today I will show you how you can flip an image vertically and horizontally. Flipping an image means reflecting an image along a miiror axis. Mathematically when we flip along horizontal axis x'=x and y'=-y whereas when flipped along vertical axis x'=-x and y'=y, where (x',y') is the transformed point and (x,y) is the original point. Here in our sample code we will first read the image from file as BufferedImage. Since there is no flip function available in Java so we will first perform scaling and then translation. We will use AffineTransformOp to transform the image and call filter() method that returns the transformed image.The transformation will be carried out in following way --->
Horizontal Flip : scale(1.0,-1.0) and translate(0,-image.getHeight())
Vertical Flip : scale(-1.0,1.0) and translate(-image.getWidth(),0)
Flip both ways : scale(-1.0,-1.0) and translate(-image.getWidth(),-image.getHeight())
AffineTransform class : It represents a 2D affine transform that performs a linear mapping from 2D coordinates to other 2D coordinates that preserves the "straightness" and "parallelness" of lines. Affine transformations can be constructed using sequences of translations, scales, flips, rotations, and shears.
AffineTransformOp class : This class uses an affine transform to perform a linear mapping from 2D coordinates in the source image or Raster to 2D coordinates in the destination image or Raster. The type of interpolation that is used is specified through a constructor, either by a RenderingHints object or by one of the integer interpolation types defined in this class.
Screenshots of the transformation
--------------------------------------------------------------------------------------------------------------------------
import java.awt.geom.AffineTransform;
import java.awt.image.AffineTransformOp;
import java.awt.image.BufferedImage;
import java.io.File;
import javax.imageio.ImageIO;
public class FlipImage {
public BufferedImage flipVertical(BufferedImage src){
AffineTransform tx=AffineTransform.getScaleInstance(-1.0,1.0); //scaling
tx.translate(-src.getWidth(),0); //translating
AffineTransformOp tr=new AffineTransformOp(tx,null); //transforming
return tr.filter(src, null); //filtering
}
public BufferedImage flipHorizontal(BufferedImage src){
AffineTransform tx=AffineTransform.getScaleInstance(1.0,-1.0); //scaling
tx.translate(0,-src.getHeight()); //translating
AffineTransformOp tr=new AffineTransformOp(tx,null); //transforming
return tr.filter(src, null); //filtering
}
public static void main(String[] args)throws Exception {
FlipImage obj=new FlipImage();
BufferedImage src=ImageIO.read(new File("src.jpeg")); //reading image
BufferedImage dest=obj.flipVertical(src); //flipping vertically
ImageIO.write(dest,"jpeg",new File("dest_flipVer.jpg"));
dest=obj.flipHorizontal(src); //flipping horizontally
ImageIO.write(dest,"jpeg",new File("dest_flipHor.jpg"));
dest=obj.flipVertical(dest); //flupping both ways
ImageIO.write(dest,"jpeg",new File("dest_flipBoth.jpg"));
}
}
Horizontal Flip : scale(1.0,-1.0) and translate(0,-image.getHeight())
Vertical Flip : scale(-1.0,1.0) and translate(-image.getWidth(),0)
Flip both ways : scale(-1.0,-1.0) and translate(-image.getWidth(),-image.getHeight())
AffineTransform class : It represents a 2D affine transform that performs a linear mapping from 2D coordinates to other 2D coordinates that preserves the "straightness" and "parallelness" of lines. Affine transformations can be constructed using sequences of translations, scales, flips, rotations, and shears.
AffineTransformOp class : This class uses an affine transform to perform a linear mapping from 2D coordinates in the source image or Raster to 2D coordinates in the destination image or Raster. The type of interpolation that is used is specified through a constructor, either by a RenderingHints object or by one of the integer interpolation types defined in this class.
Screenshots of the transformation
 |
| Original image |
 |
| Image after Vertical flip |
 |
| Image after Horizontal flip |
 |
| Image after flipping both ways |
Java Source Code
--------------------------------------------------------------------------------------------------------------------------
import java.awt.geom.AffineTransform;
import java.awt.image.AffineTransformOp;
import java.awt.image.BufferedImage;
import java.io.File;
import javax.imageio.ImageIO;
public class FlipImage {
public BufferedImage flipVertical(BufferedImage src){
AffineTransform tx=AffineTransform.getScaleInstance(-1.0,1.0); //scaling
tx.translate(-src.getWidth(),0); //translating
AffineTransformOp tr=new AffineTransformOp(tx,null); //transforming
return tr.filter(src, null); //filtering
}
public BufferedImage flipHorizontal(BufferedImage src){
AffineTransform tx=AffineTransform.getScaleInstance(1.0,-1.0); //scaling
tx.translate(0,-src.getHeight()); //translating
AffineTransformOp tr=new AffineTransformOp(tx,null); //transforming
return tr.filter(src, null); //filtering
}
public static void main(String[] args)throws Exception {
FlipImage obj=new FlipImage();
BufferedImage src=ImageIO.read(new File("src.jpeg")); //reading image
BufferedImage dest=obj.flipVertical(src); //flipping vertically
ImageIO.write(dest,"jpeg",new File("dest_flipVer.jpg"));
dest=obj.flipHorizontal(src); //flipping horizontally
ImageIO.write(dest,"jpeg",new File("dest_flipHor.jpg"));
dest=obj.flipVertical(dest); //flupping both ways
ImageIO.write(dest,"jpeg",new File("dest_flipBoth.jpg"));
}
}
--------------------------------------------------------------------------------------------------------------------------
Download Links
--------------------------------------------------------------------------------------------------------------------------
Monday, January 21, 2013
Today I am going to post a program that will use a text string as a clipping path and draw an image with it. As you know, Graphics2D can do a number of operations like transformations,clipping and alpha compositing. Here in our case, we will use images. First of all we will rotate the user space. This is just to give our output a more better look. The clipping shape is created in the method getClippingShape(Graphics) method. Here a text is chosen and a Font instance is created. This font is used to create GlyphVector for the clipping shape string. Then the shape is retrieved by calling getOutline() method of GlyphVector. The clip method of Graphics2D is called, followed by reading of the image from file using ImageIO's read method. Finally the image is drawn on panel and displayed.
Screenshots of original and final images
--------------------------------------------------------------------------------------------------------------------------
import java.awt.*;
import java.awt.font.*;
import java.awt.image.BufferedImage;
import java.io.File;
import java.io.IOException;
import javax.swing.JFrame;
import javax.swing.JPanel;
import javax.imageio.ImageIO;
public class ClipImage extends JPanel{
@Override
public void paintComponent(Graphics g){
Graphics2D g2 = (Graphics2D)g; //casting
Dimension d = getSize();
g2.rotate(-Math.PI / 12, d.width / 2, d.height / 2); //rotating
g2.clip(getClippingShape(g2)); //clipping
try{
//reading image from file
final BufferedImage image = ImageIO.read(new File("image.jpg"));
g2.drawImage(image, 0, 0, null); //drawing image
}catch(IOException e){
e.printStackTrace();
}
}
private Shape getClippingShape(Graphics2D g2) {
String s = "Java 2D"; //defining clipping text
Font font = new Font("Serif", Font.PLAIN, 122); //text font
FontRenderContext frc = g2.getFontRenderContext();
GlyphVector gv = font.createGlyphVector(frc, s); //text glyph
Shape clippingShape = gv.getOutline(10, 120); //getting clip shape
return clippingShape; //returning shape
}
public static void main(String[] args){
JFrame f=new JFrame("Clipping_Image");
f.getContentPane().add(new ClipImage());
f.setSize(430,220);
f.setVisible(true);
f.setDefaultCloseOperation(f.EXIT_ON_CLOSE);
}
}
--------------------------------------------------------------------------------------------------------------------------
DOWNLOAD the source from Mediafire
DOWNLOAD the source from 4shared
Screenshots of original and final images
 |
| Origibal Image |
 |
| Final Clip Image |
--------------------------------------------------------------------------------------------------------------------------
Java Source Code
--------------------------------------------------------------------------------------------------------------------------import java.awt.*;
import java.awt.font.*;
import java.awt.image.BufferedImage;
import java.io.File;
import java.io.IOException;
import javax.swing.JFrame;
import javax.swing.JPanel;
import javax.imageio.ImageIO;
public class ClipImage extends JPanel{
@Override
public void paintComponent(Graphics g){
Graphics2D g2 = (Graphics2D)g; //casting
Dimension d = getSize();
g2.rotate(-Math.PI / 12, d.width / 2, d.height / 2); //rotating
g2.clip(getClippingShape(g2)); //clipping
try{
//reading image from file
final BufferedImage image = ImageIO.read(new File("image.jpg"));
g2.drawImage(image, 0, 0, null); //drawing image
}catch(IOException e){
e.printStackTrace();
}
}
private Shape getClippingShape(Graphics2D g2) {
String s = "Java 2D"; //defining clipping text
Font font = new Font("Serif", Font.PLAIN, 122); //text font
FontRenderContext frc = g2.getFontRenderContext();
GlyphVector gv = font.createGlyphVector(frc, s); //text glyph
Shape clippingShape = gv.getOutline(10, 120); //getting clip shape
return clippingShape; //returning shape
}
public static void main(String[] args){
JFrame f=new JFrame("Clipping_Image");
f.getContentPane().add(new ClipImage());
f.setSize(430,220);
f.setVisible(true);
f.setDefaultCloseOperation(f.EXIT_ON_CLOSE);
}
}
--------------------------------------------------------------------------------------------------------------------------
Download Links
--------------------------------------------------------------------------------------------------------------------------DOWNLOAD the source from Mediafire
DOWNLOAD the source from 4shared
Tuesday, December 18, 2012
Today I am going to post how you can convert any image to gray scale in Java. First the image is read from a file using javax.imageio.ImageIO class as a BuffertedImage. A function is written that takes in a BufferedImage as parameter and returns a color converted image. An instance of java.awt.image.ColorConvertOp is created which takes in an object of java.awt.color.ColorSpace as first parameter and null as 2nd parameter( since there is no RenderingHints). Then the filter(src,dest) method is called which actually does the work. Then the final image is written to a file in jpeg format as dest.jpg .
How ColorCovertOp works : This class performs a pixel-by-pixel color conversion of the data in the source image. The resulting color values are scaled to the precision of the destination image. Color conversion can be specified via an array of ColorSpace objects or an array of ICC_Profile objects.
ColorSpace class : This is an abstract class whose getInstance(int) method is called to get an instance and CS_GRAY is passed as parameter which defines a built in linear gray scale color space.
Screenshots of images are shown below
--------------------------------------------------------------------------------------------------------------------------
import java.io.File;
import java.awt.Color;
import java.awt.Graphics;
import java.awt.Graphics2D;
import java.awt.color.ColorSpace;
import javax.swing.JFrame;
import javax.swing.JPanel;
import java.awt.image.BufferedImage;
import java.awt.image.ColorConvertOp;
import javax.imageio.ImageIO;
@SuppressWarnings("serial")
public class GrayScale extends JPanel{
@Override
public void paintComponent(Graphics g){
Graphics2D g2d=(Graphics2D)g;
try{ //reading from file
BufferedImage src=ImageIO.read(new File("src.jpg"));
BufferedImage dest=convertToGray(src); //getting destination image
g2d.drawImage(dest,0,0,this); /* drawing the image on panel and then writing to a file */
ImageIO.write(dest,"jpeg",new File("dest.jpg"));
}catch(Exception e){
e.printStackTrace();
}
}
public BufferedImage convertToGray(BufferedImage src){
//creating instance and using in-built linear gray scale
ColorConvertOp grayOp = new ColorConvertOp(
ColorSpace.getInstance(ColorSpace.CS_GRAY), null);
return grayOp.filter(src,null); //converting to gray scale
}
public static void main (String[] args) {
JFrame jf=new JFrame("GRAY_SCALE");
GrayScale obj=new GrayScale();
jf.getContentPane().add(obj);
jf.setVisible(true);
jf.setSize(320,235);
jf.setDefaultCloseOperation(jf.EXIT_ON_CLOSE);
}
}
--------------------------------------------------------------------------------------------------------------------------
DOWNLOAD the source from 4shared
--------------------------------------------------------------------------------------------------------------------------
Reflect or flip an image
Change brightness of image using RescaleOp
Java program to draw partially transparent image using Graphics2D
How ColorCovertOp works : This class performs a pixel-by-pixel color conversion of the data in the source image. The resulting color values are scaled to the precision of the destination image. Color conversion can be specified via an array of ColorSpace objects or an array of ICC_Profile objects.
ColorSpace class : This is an abstract class whose getInstance(int) method is called to get an instance and CS_GRAY is passed as parameter which defines a built in linear gray scale color space.
Screenshots of images are shown below
 |
| Original image |
 | |
| Gray Scale image |
--------------------------------------------------------------------------------------------------------------------------
Java Source Code
--------------------------------------------------------------------------------------------------------------------------import java.io.File;
import java.awt.Color;
import java.awt.Graphics;
import java.awt.Graphics2D;
import java.awt.color.ColorSpace;
import javax.swing.JFrame;
import javax.swing.JPanel;
import java.awt.image.BufferedImage;
import java.awt.image.ColorConvertOp;
import javax.imageio.ImageIO;
@SuppressWarnings("serial")
public class GrayScale extends JPanel{
@Override
public void paintComponent(Graphics g){
Graphics2D g2d=(Graphics2D)g;
try{ //reading from file
BufferedImage src=ImageIO.read(new File("src.jpg"));
BufferedImage dest=convertToGray(src); //getting destination image
g2d.drawImage(dest,0,0,this); /* drawing the image on panel and then writing to a file */
ImageIO.write(dest,"jpeg",new File("dest.jpg"));
}catch(Exception e){
e.printStackTrace();
}
}
public BufferedImage convertToGray(BufferedImage src){
//creating instance and using in-built linear gray scale
ColorConvertOp grayOp = new ColorConvertOp(
ColorSpace.getInstance(ColorSpace.CS_GRAY), null);
return grayOp.filter(src,null); //converting to gray scale
}
public static void main (String[] args) {
JFrame jf=new JFrame("GRAY_SCALE");
GrayScale obj=new GrayScale();
jf.getContentPane().add(obj);
jf.setVisible(true);
jf.setSize(320,235);
jf.setDefaultCloseOperation(jf.EXIT_ON_CLOSE);
}
}
--------------------------------------------------------------------------------------------------------------------------
Download Links
--------------------------------------------------------------------------------------------------------------------------DOWNLOAD the source from 4shared
--------------------------------------------------------------------------------------------------------------------------
Related Posts
--------------------------------------------------------------------------------------------------------------------------Reflect or flip an image
Change brightness of image using RescaleOp
Java program to draw partially transparent image using Graphics2D
Monday, October 15, 2012
Today I am going to post a program that will be able to change i.e control the brightness of any image in Java. First the image is read from a file using Java's ImageIO class (in javax.imageio package) as a BufferedImage. A function is written that takes in the image and brightness value as parameter. Inside it an object of RescaleOp class (in java.awt.image package) is created using the brightness value. Then the object's filter(src,dest) method is called and source image is passed (destination is kept null) and the final image developed is returned. This final image is drawn on a JPanel and shown in frame. Also this image is saved in a new file named dest.jpg in jpeg format using ImageIO class. Screenshots of the original and the brightened image is shown below
--------------------------------------------------------------------------------------------------------------------------
import java.io.File;
import java.awt.Graphics;
import java.awt.Graphics2D;
import java.awt.color.ColorSpace;
import javax.swing.JFrame;
import javax.swing.JPanel;
import java.awt.image.BufferedImage;
import java.awt.image.RescaleOp;
import javax.imageio.ImageIO;
@SuppressWarnings("serial")
public class Brighten extends JPanel{
@Override
public void paintComponent(Graphics g){
Graphics2D g2d=(Graphics2D)g;
try{
//reading image data from file
BufferedImage src=ImageIO.read(new File("src.jpg"));
/* passing source image and brightening by 50%-value of 1.0f means original brightness */
BufferedImage dest=changeBrightness(src,1.5f);
//drawing new image on panel
g2d.drawImage(dest,0,0,this);
//writing new image to a file in jpeg format
ImageIO.write(dest,"jpeg",new File("dest.jpg"));
}catch(Exception e){
e.printStackTrace();
}
}
public BufferedImage changeBrightness(BufferedImage src,float val){
RescaleOp brighterOp = new RescaleOp(val, 0, null);
return brighterOp.filter(src,null); //filtering
}
public static void main (String[] args) {
JFrame jf=new JFrame("BRIGHTEN");
Brighten obj=new Brighten();
jf.getContentPane().add(obj);
jf.setVisible(true);
jf.setSize(325,270);
jf.setDefaultCloseOperation(jf.EXIT_ON_CLOSE);
}
}
--------------------------------------------------------------------------------------------------------------------------
DOWNLOAD the source from Mediafire
DOWNLOAD the source from 4shared
--------------------------------------------------------------------------------------------------------------------------
 |
| Original image |
 |
| Brightened by 50% |
--------------------------------------------------------------------------------------------------------------------------
SOURCE CODE
--------------------------------------------------------------------------------------------------------------------------import java.io.File;
import java.awt.Graphics;
import java.awt.Graphics2D;
import java.awt.color.ColorSpace;
import javax.swing.JFrame;
import javax.swing.JPanel;
import java.awt.image.BufferedImage;
import java.awt.image.RescaleOp;
import javax.imageio.ImageIO;
@SuppressWarnings("serial")
public class Brighten extends JPanel{
@Override
public void paintComponent(Graphics g){
Graphics2D g2d=(Graphics2D)g;
try{
//reading image data from file
BufferedImage src=ImageIO.read(new File("src.jpg"));
/* passing source image and brightening by 50%-value of 1.0f means original brightness */
BufferedImage dest=changeBrightness(src,1.5f);
//drawing new image on panel
g2d.drawImage(dest,0,0,this);
//writing new image to a file in jpeg format
ImageIO.write(dest,"jpeg",new File("dest.jpg"));
}catch(Exception e){
e.printStackTrace();
}
}
public BufferedImage changeBrightness(BufferedImage src,float val){
RescaleOp brighterOp = new RescaleOp(val, 0, null);
return brighterOp.filter(src,null); //filtering
}
public static void main (String[] args) {
JFrame jf=new JFrame("BRIGHTEN");
Brighten obj=new Brighten();
jf.getContentPane().add(obj);
jf.setVisible(true);
jf.setSize(325,270);
jf.setDefaultCloseOperation(jf.EXIT_ON_CLOSE);
}
}
--------------------------------------------------------------------------------------------------------------------------
DOWNLOAD LINKS
--------------------------------------------------------------------------------------------------------------------------DOWNLOAD the source from 4shared
--------------------------------------------------------------------------------------------------------------------------
RELATED POSTS
--------------------------------------------------------------------------------------------------------------------------
Wednesday, August 1, 2012
Today I am going to post a program to draw partially transparent image using Graphics2D in Java. In this example I am going to paint the background first by drawing ellipses with different colors .The image is broken into tiles using BufferedImage and each tile is given a separate transparency(alpha value) and then drawn above the background. Screenshots are given below
--------------------------------------------------------------------------------------------------------------------------
import java.awt.*;
import java.awt.geom.*;
import java.awt.image.BufferedImage;
import java.io.*;
import javax.swing.*;
import com.sun.image.codec.jpeg.*;
public class TransparentImage extends JPanel {
private BufferedImage mImage;
public static void main(String[] args) {
try {
String filename = "Image.jpeg";
JFrame f = new JFrame("TransparentImage v1.0");
TransparentImage showOff = new TransparentImage(filename);
f.getContentPane().add(showOff);
f.setSize(f.getPreferredSize());
f.setResizable(false);
f.setDefaultCloseOperation(f.EXIT_ON_CLOSE);
f.setVisible(true);
}catch (Exception e) {
System.out.println(e);
System.exit(0);
}
}
public TransparentImage(String filename) throws Exception{
// Get the specified image.
InputStream in = getClass().getResourceAsStream(filename);
JPEGImageDecoder decoder = JPEGCodec.createJPEGDecoder(in);
mImage = decoder.decodeAsBufferedImage();
in.close();
// Set our size to match the image's size.
setPreferredSize(new Dimension((int)mImage.getWidth(), (int)mImage.getHeight()));
}
@Override
public void paintComponent(Graphics g) {
Graphics2D g2 = (Graphics2D)g;
// Turn on antialiasing
g2.setRenderingHint(RenderingHints.KEY_ANTIALIASING,RenderingHints.VALUE_ANTIALIAS_ON);
drawBackground(g2);
drawImageTile(g2);
}
private void drawBackground(Graphics2D g2) {
// Draw circles of different colors
int side = 45;
int width = getSize().width;
int height = getSize().height;
Color[] colors = { Color.yellow, Color.cyan, Color.orange,
Color.pink, Color.magenta, Color.lightGray };
for (int y = 0; y < height; y += side) {
for (int x = 0; x < width; x += side) {
Ellipse2D ellipse = new Ellipse2D.Float(x, y, side, side);
int index = (x + y) / side % colors.length;
g2.setPaint(colors[index]);
g2.fill(ellipse);
}
}
}
private void drawImageTile(Graphics2D g2) {
int side = 36;
int width = mImage.getWidth();
int height = mImage.getHeight();
for (int y = 0; y < height; y += side) {
for (int x = 0; x < width; x += side) {
// Calculate an appropriate transparency value
float xBias = (float)x / (float)width;
float yBias = (float)y / (float)height;
float alpha = 1.0f - Math.abs(xBias - yBias);
g2.setComposite(AlphaComposite.getInstance(
AlphaComposite.SRC_OVER, alpha));
// Draw the subimage
int w = Math.min(side, width - x);
int h = Math.min(side, height - y);
BufferedImage tile = mImage.getSubimage(x, y, w, h);
g2.drawImage(tile, x, y, null);
}
}
// Reset the composite.
g2.setComposite(AlphaComposite.getInstance(AlphaComposite.SRC_OVER));
}
}
NOTE : in order to run this program perfectly you must have a Image.jpeg file in the same directory as that of your java file.
--------------------------------------------------------------------------------------------------------------------------
Change brightness of image using RescaleOp
 |
| Original Image |
| Transparent Image |
SOURCE CODE
--------------------------------------------------------------------------------------------------------------------------import java.awt.*;
import java.awt.geom.*;
import java.awt.image.BufferedImage;
import java.io.*;
import javax.swing.*;
import com.sun.image.codec.jpeg.*;
public class TransparentImage extends JPanel {
private BufferedImage mImage;
public static void main(String[] args) {
try {
String filename = "Image.jpeg";
JFrame f = new JFrame("TransparentImage v1.0");
TransparentImage showOff = new TransparentImage(filename);
f.getContentPane().add(showOff);
f.setSize(f.getPreferredSize());
f.setResizable(false);
f.setDefaultCloseOperation(f.EXIT_ON_CLOSE);
f.setVisible(true);
}catch (Exception e) {
System.out.println(e);
System.exit(0);
}
}
public TransparentImage(String filename) throws Exception{
// Get the specified image.
InputStream in = getClass().getResourceAsStream(filename);
JPEGImageDecoder decoder = JPEGCodec.createJPEGDecoder(in);
mImage = decoder.decodeAsBufferedImage();
in.close();
// Set our size to match the image's size.
setPreferredSize(new Dimension((int)mImage.getWidth(), (int)mImage.getHeight()));
}
@Override
public void paintComponent(Graphics g) {
Graphics2D g2 = (Graphics2D)g;
// Turn on antialiasing
g2.setRenderingHint(RenderingHints.KEY_ANTIALIASING,RenderingHints.VALUE_ANTIALIAS_ON);
drawBackground(g2);
drawImageTile(g2);
}
private void drawBackground(Graphics2D g2) {
// Draw circles of different colors
int side = 45;
int width = getSize().width;
int height = getSize().height;
Color[] colors = { Color.yellow, Color.cyan, Color.orange,
Color.pink, Color.magenta, Color.lightGray };
for (int y = 0; y < height; y += side) {
for (int x = 0; x < width; x += side) {
Ellipse2D ellipse = new Ellipse2D.Float(x, y, side, side);
int index = (x + y) / side % colors.length;
g2.setPaint(colors[index]);
g2.fill(ellipse);
}
}
}
private void drawImageTile(Graphics2D g2) {
int side = 36;
int width = mImage.getWidth();
int height = mImage.getHeight();
for (int y = 0; y < height; y += side) {
for (int x = 0; x < width; x += side) {
// Calculate an appropriate transparency value
float xBias = (float)x / (float)width;
float yBias = (float)y / (float)height;
float alpha = 1.0f - Math.abs(xBias - yBias);
g2.setComposite(AlphaComposite.getInstance(
AlphaComposite.SRC_OVER, alpha));
// Draw the subimage
int w = Math.min(side, width - x);
int h = Math.min(side, height - y);
BufferedImage tile = mImage.getSubimage(x, y, w, h);
g2.drawImage(tile, x, y, null);
}
}
// Reset the composite.
g2.setComposite(AlphaComposite.getInstance(AlphaComposite.SRC_OVER));
}
}
NOTE : in order to run this program perfectly you must have a Image.jpeg file in the same directory as that of your java file.
--------------------------------------------------------------------------------------------------------------------------
RELATED POSTS
--------------------------------------------------------------------------------------------------------------------------Change brightness of image using RescaleOp
Subscribe to:
Posts
(Atom)
Popular Posts
-
 Today I will show you how you can implement Bankers algorithm in Java. The Banker's algorithm is a resource allocation and deadlock a...
 -
------------------------- UPDATE ------------------------- I have updated the code on request of some followers so that they can directly...
-
 Today I am going to show how to convert a postfix expression to an infix expression using stack in Java. In an earlier post here we ...
 -
 Today in this article I will tell you how to convert an infix expression to postfix expression using stack. This is an important applicat...
 -
 --------------------UPDATE------------------- I have updated my post so that now it can detect IE 11. This modification was necessary as t...
 -
 Today I am going to show you how you can generate and validate captcha. A CAPTCHA (an acronym for "Completely Automated Public Turin...
 -
 Today I am going to post a program that will be able to produce all the mColorings of a given graph G. What is mColoring : The problem st...
 -
 Today in this article I will show you how to create or develop a Tower of Hanoi game in Java. The Tower of Hanoi is a famous problem tha...
